Dec 28, 2008

Change or turn off sounds in windows xp

If you want to change the sound played by windows xp for a particular event such as startup, shutdown, critical error etc. you can do that easily by defining sound the file which you want to be played. But remember, the file should be in a .wav format. You can also stop windows from playing that sound every time the event occurs. 

Go to the Control Panel Start > Settings > Control Panel
 
Double click on Sounds icon
 
Scroll through the list of event sounds and select the program and the related event that you want to modify


Use controls at the bottom to disable (set sound name to "None") or select a different sound

Click "OK" and close the Control Panel before testing the event sound

Copy text from DOS window

Some times while working in DOS, you need to copy some text to other applications like MS Word. But you cannot directly copy your text by pressing Ctrl+C and paste it by Ctrl+V. The solution is as follows:

"Start > Programs > Command Prompt > DOS" 
 
Run the character mode program that you want to import data from, and go to the screen with the data you want to capture.
 
Right click the title bar of the DOS box
 

Select "Edit | Mark"


 Click and drag the mouse until you select the data area that you want to copy. Press ENTER when you've finished selecting.


 Switch to the Windows program that you want to import the just copied data to, and select its paste function.


Dec 25, 2008

Prevent your drives from damaging

If you have to turn your computer off and back on immediately, wait for some time, say about 30 seconds before turning it back on. That gives the drive (or drives, if you have more than one) plenty of time to finish spinning and park their heads before they get the wake-up jolt. Otherwise the heads could damage the drive surface. This may lead to loss of data or replacement of your drive(s).

Google search tips - search more efficiently

You can use these search techniques to search more efficiently on Google.

link:url Shows other pages with links to that url.

related:url same as "what's related" on serps.

site:domain restricts search results to the given domain.

allinurl: shows only pages with all terms in the url.

inurl: like allinurl, but only for the next query word.

allintitle: shows only results with terms in title.

intitle: similar to allintitle, but only for the next word. "intitle:webmasterworld google" finds only pages with webmasterworld in the title, and google anywhere on the page.

cache:url will show the Google version of the passed url.

info:url will show a page containing links to related searches, backlinks, and pages containing the url. This is the same as typing the url into the search box.

spell: will spell check your query and search for it.

stocks: will lookup the search query in a stock index.

filetype: will restrict searches to that filetype. "-filetype:doc" to remove Microsoft word files.

daterange: is supported in Julian date format only. 2452384 is an example of a Julian date.

maps: If you enter a street address, a link to Yahoo Maps and to MapBlast will be presented.

phone: enter anything that looks like a phone number to have a name and address displayed. Same is true for something that looks like an address (include a name and zip code)

site:www.somesite.net "+www.somesite.+net"
(tells you how many pages of your site are indexed by google)

allintext: searches only within text of pages, but not in the links or page title

allinlinks: searches only within links, not text or title

Disable annoying balloon tips

Windows xp balloon tips can be very annoying at times. There is a way to turn them off. 
Go to Start > Run.
Type Regedit and hit enter.
Navigate to ‘HKEY_CURRENT_USER/Software/Microsoft/Windows/CurrrentVersion/Explorer’

In the right pane, right click and click new click DWORD. Name the new entry as ‘EnableBalloonTips’ and assign it a value of ‘0’. 

There you go, no more annoying balloon tips.

Enable ClearType in xp

ClearType is a method used by xp to smooth the onscreen fonts. This feature is quite beneficial for flat screen or TFT monitors. 

To turn on ClearType, right click on the desktop and click on properties.
Select the appearance tab and click on effects button at the bottom of the menu.

Select the ClearType option from the dropdown of the ‘use this method to smooth the edges of onscreen fonts.’

Click ok and again click ok.
You can immediately notice the difference.

Open a small chat program in Windows xp

Windows has a small inbuilt chat program which is not accessible easily. To open it, simple go to start > run. Type winchat and hit enter.

See what is saved in clipboard

When you copy any text, image or take a screen shot of the screen this data gets automatically in a program called clipboard. You may have come across messages by some applications asking you to leave or clear the data stored in clipboard. This is where your copied date is stored temporarily. To view the saved data in clipboard, open the run dialog box by clicking start > run. Type clipbrd and hit enter. You can see the clipboard window and the copied data in it.

How to close hung programs faster

In windows xp, when an application crashes, you press Ctrl+Alt+Del to bring up the Task Manager to close the non responding program manually by pressing the end task button. But the application does not end immediately but takes some time to do so. You can actually reduce this time by making a registry tweak. 

To do this, click on start menu and click run to open the run dialog box.
In the run dialog box type regedit and hit enter.

In the resulting window, navigate yourself to HKEY_CURRENT_USER\ControlPanel\Desktop’


In the right pane, you will find a number of entries. Double click the one having the name ‘HungAppTimeout’. The edit string menu pops up. The default value in the value data field is 5000. this is the time in milliseconds after which the hung application ends. Reduce the value to about 500 or 600 and click ok.

Next time when any application hangs, you can end it quite faster

Dec 24, 2008

Rotate multiple images quickly

When you take pictures in landscape mode from your camera and then transfer them to pc, you have to manually turn them clockwise or anticlockwise. This takes up a lot of time. To fix it, select the photos that you want to turn by holding the ctrl key, and right click on any one of the selected files and click rotate clockwise or rotate counterclockwise as per the requirement. There you go…all in one go!

Dec 22, 2008

Insert image as watermark in MS Word documents

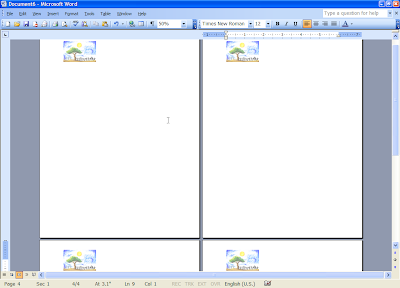
You can use any image as a watermark in your documents, which will appear on every page’s header or footer. 
To do this, click on View > Header and Footer.


Header and Footer toolbar appears.


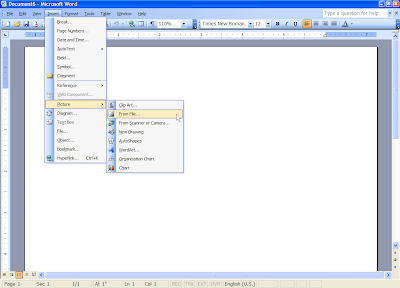
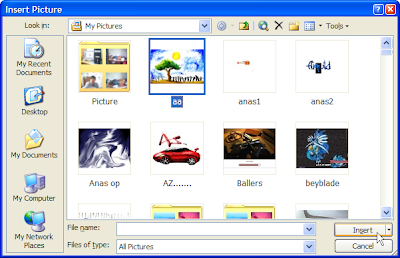
Now click on Insert > Picture > From File and select the image file you want as watermark for the browse menu

Click the close button on the header and footer toolbar to confirm.
Increase the number of files in recently opened files list

When you open a file in MS Word, it keeps a track of it and displays it in the list of recently opened files in the file menu. But, by default Word displays only the last 4 opened files. 

To increase the number files shown in the list of of recently opened documents, Go to Tools > Options.

From the resulting menu, select the General tab, notice the option ‘Recently used file list’ change the number next to it from 5 to 9.

Next time when you open word it will show your specified number of files in the recently accessed documents list.

How to insert dummy text in MS Word

To insert dummy text quickly in MS Word 2003, simply type =rand(m,n) and press enter, where ‘m’ is the number of paragraphs and ‘n’ is the number of sentences per paragraph. This trick is useful if you want to print a test page.

e.g. if you want to print a dummy text containing 5 number of paragraphs and 6 number of sentences per paragraph type =rand(5,6)

How to add numbers quickly in Excel

If you want to add the numbers in cells A1 to A3, type the numbers in cells A1 to A3, then select the blank cell A4 and type =A1+A2+A3 and hit enter. You can use this technique to add as many cell as you like. But if want a still easier way to do this, then select the cell where you want the sum of cells to be displayed and click on the autosum button and press enter.


How to automatically fill sequential data in MS Excel 2003

It is a very time consuming practice to enter all the months or days or any other sequential data in adjacent rows or columns one by one. To reduce this effort, just follow these steps.

Type the first entry

Place your cursor at the bottom right corner of the cell

When the cursor transforms into a thin black + sign, press the left mouse key and drag it to across the rows or columns according to your requirement.

Disable office online in MS Word 2003

The office online side bar can be very annoying at times when you open Microsoft Word 2003. To disable it,

Press F1 to open Word Help

Click on Online Content Settings…

Uncheck the checkbox next to show contents and links from Microsoft Office Online.

Click OK.

Shutdown or restart pc in one click

Sometimes clicking on start menu, then clicking on shutdown button and then clicking on shutdown or restart button seems a long method to shutdown or restart your pc. If you want to create your own shutdown or restart you can do it this way:

Right click on desktop > click on new > click on shortcut

Type shutdown > hit enter
Hit enter again.

You have your new shutdown icon on the desktop ready to be double cliked!
If you want to set the time after which your pc shuts down and display some message you can do that by typing the shortcut name as ‘shutdown -s -t xx -c “message”
 Where xx represents the time in seconds after which your pc will shutdown. You can type any message such as “bye everyone” in place of “message”, but it should be enclosed in double quotes. 
e.g. shutdown -s -t 05 -c "bye everyone”

Similarly if you want to restart your pc you can type the name of shortcut as shutdown -r -t xx -c "message"

Use your photos as screensavers

How to show your photos as screen saver
Right click on desktop and click on properties
Select the screen savers tab and select the My Pictures Slideshow from the dropdown menu.

It will show slideshow of your pictures saved in my pictures folder in my documents.If you want to specify some other folder containing your pics, click on the settings tab, and click on the browse button. Browse for the particular folder containing your photos and click ok.

You can also set other parameters from the settings menu such as how often should pictures change, how big should pictures be etc. 

Click ok to save changes.

Change the default location for installing new applications

By default, windows xp installs all the new applications to the directory c:\Program Files.
If you want to change the location of installing new applications, 

Go to start > run
Type regedit and hit ok

Go to HKEY_LOCAL_MACHINE\SOFTWARE\Microsoft\Windows\CurrentVersion
You will find a number of values there. Double click on the ‘ProgramFilesDir.’

Type the new location where you want to install your new applications hereafter.

Change the location of My Documents

It is better to change the location of my documents in order to prevent all your important documents in case of a system crash. By default, the My Documents folder is saved in the hard disk partition containing the operating system. So, if your windows xp installation goes bad, and formatting the system partition is the only way, you would lose your My Documents folder too. To prevent this, you should change the location of My Documents folder to some different partition of your hard disk. To do this,

Right click on My Documents folder and click on properties.

Click on move and select the new location where you want to place the folder.

Click ok, Click ok again

Show extensions of all files types

To show the file extensions of all your files,

Go to control panel and double click on folder options

Select the view tab and uncheck the ‘hide extensions of known file types’ checkbox

Click ok

Search lyrics of any song quickly

You don’t need to go to any specific lyric site and then search for your favorite song’s lyrics there. There is a quicker method you can use. 

To search any songs lyrics just type the songs name followed by : (colon)
e.g. to search for the lyrics of the song ‘In The End’ just type, in the end: lyrics

How to use proxy in Internet Explorer

Click tools > internet options

Select the connections tab and click on LAN settings

Check the checkbox for ‘use a proxy server for your LAN’ and enter the proxy and the port in the next box.
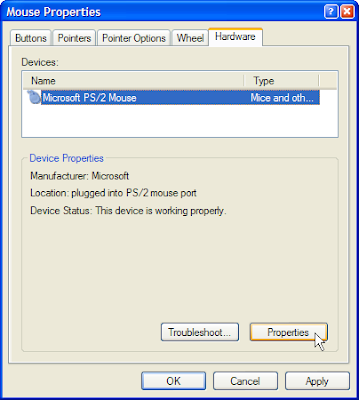
How to enhance your mouse's performance

You can make your mouse cursor’s movement more precise and smooth.
Open Control Panel
Double click on mouse icon
Select the hardware tab and click on properties

Select the advanced settings tab and increase the sample rate to its maximum value

Also increase the input buffer length to its maximum value


Click ok

Again click ok and finally restart your pc

You will notice the change in your mouse’s performance.

Other simple option is to change the pointer speed and check the enhance pointer precision.


How to icon names disappear

This is a very cool trick. It makes the text below any icon or folder disappear. So what you see is only the icon and not its label. To do this,

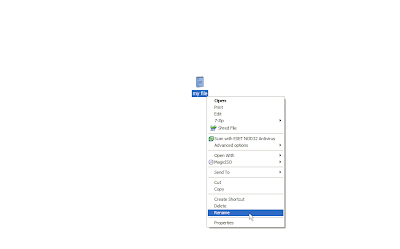
Right click on the icon > rename


Hold down the Alt key and rename the file as 255.
Click enter.

There you go, no text beneath!

This trick works only if you enter the number 255 using the keypad on the right of the keyboard, and not the number keys provided at the top.
,

How to keep your files private

If you have some of your files that you don’t want others to open, you can protect them by assigning a password to them. This way, every time anyone tries to access it, he/she will be prompted to enter the password.

To make your file private, just right click on it > send to > compressed folder

Windows asks you whether to designate compressed folders as the application for handling zip files. Click ok. 

Now open the compressed file.
Go to file menu and click on add a password.

Enter the password for the file and click ok.

The next time you try to open that file you will be prompted to enter the password. You can delete the original uncompressed file. This way only you can open the file. You can use this procedure for password protecting your other files.