Showing posts with label registry tweaks. Show all posts

Jun 1, 2009

Change the size and quality of thumbnails in Windows XP

thumbnail size increase

While navigating through different folders in Windows Explorer, sometimes it feels that the default thumbnail size of images should be a bit bigger. Or some may insist on having the thumbnail  smaller than its preset size, especially if it is taxing on their system. Here is a registry tweak you can do to change the thumbnail size as well as its image quality in Windows Explorer. Here is how to do it:

1. Click Start > Run and type regedit

2. In the registry window, go to the following location:

HKEY_CURRENT_USER\ Software\ Microsoft \ Windows\ CurrentVersion\ Explorer

Create a new DWORD value called ThumbnailSize, and set the value between 32 and 256.

And/or create another DWORD value called ThumbnailQuality, and set the value between 50 and 100.

You can do the same thing using TweakUI utility also. 

Click on Explorer and then click Thumbnials. Move the slider to change the image quality of thumbnail and put any value between 32 to 256 in the thumnail size option. Click Apply and check for changes. You may need to go back to the previous folder and then return to the folder containing thumbails to see the change. 

increase size of thumbnail, increase photo preview size

May 22, 2009

How to hide your hard disk partitions

I have always wished that I could hide my hard disk's partitions. This can be a good way of protecting your important files from the people around you who never miss any opportunity to sneak into your PC. Or it can be a really funny and maybe a cruel prank for someone who is still a novice to computers! But someone smart enough to disable this registry tweak or simply by using a little bit of common sense can have access to your drives in no time. So this is not the best way to hide your stuff from people hoping nobody will find it. I would recommend it to be played as a prank.

This trick hides all your local or networked drives. It does not deletes or disables them. So rest assured you can get them back the way they were before. This is how you hide your drives:

1.Open Start > Run and type regedit. The registry editor window opens up.

2.Find your way to HKEY_CURRENT_ USER\Software\ Microsoft\ Windows\Curre ntVersion\Policies\ Explorer.

3.In the right hand side pane, create a new DWORD value and set its value as 3FFFFFF (Hexadecimal)

hide your hard disk partitions

4.Now close window and restart your computer.

5.When the PC starts, open My Computer. All your drives would have gone. Only the Document folders will be there. But if you enter the path of any folder located in any drive such as C:/Program Files/Microsoft you can open that folder. So, anyone brainy enough to think of this can enter any drive.

6.To enable display of drives in My Computer as it was before, just delete the DWORD entry that you created in the registry editor and restart your PC.

May 21, 2009

How to end tasks automatically in Windows XP

Sometimes it happens that a certain application hangs and prevents the PC to shutdown properly and it also consumes a considerable chunk of Page file memory. As a result, your system runs at a lower speed than its original potential. To disable these applications automatically after a particular time you will have to do some registry tweaking. Just follow these steps:
But before that, do not forget to backup your registry.

1.Open Notepad and paste the following text in a new file-

Windows Registry Editor Version 5.00
[HKEY_LOCAL_MACHINE\SYSTEM\CurrentControlSet\Control\Session Manager\Memory Management]
"ClearPageFileAtShutdown"=dword:00000001
[HKEY_USERS\.DEFAULT\Control Panel\Desktop]
"AutoEndTasks"="1"

[HKEY_LOCAL_MACHINE\SYSTEM\CurrentControlSet\Control]
"WaitToKillServiceTimeout"="1000"

2.Save the file as shutdown.reg
3.Double click the file thus saved to add the information to the registry.
Thats it!

May 17, 2009

How to disable programs on startup in Windows XP

A lot of programs like download managers, DVD burners, P2P clients etc associate themselves to run at startup every time Windows XP starts. Actually, this is a good feature, otherwise you would have to start the anti virus manually whenever you boot your PC which would have been a very tiring job. But this run-at-startup feature is also one of the most common reasons for a sluggish startup. When you install a program like say an on-screen image capturing utility, odds are that it will schedule itself to run at startup. Now even if you don't want to use it, the damn thing will be sitting there at the bottom right corner of your screen consuming some of the precious system memory. As the number of such programs increases more system memory gets used by them. This eventually slows down the startup process. 

You can of course search for 'do not run when Windows starts' option or something like that in the program's settings, but you will have to do that for every such program. To reduce the labor, you can do some tweaking with the registry and voila! 

Here is how to disable the programs you don't want to automatically start every time Windows boots using the registry editor.

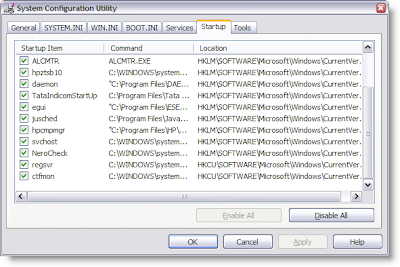
1.Click Start > Run and type 'msconfig' without quotes. Hit enter to get the system configuration utility.

2.Click the 'Startup' tab to find the list of all the startup items that load automatically.

disable programs on startup in windows xp3.Uncheck the ones that you do not need. 

4.Restart the computer.

Feb 16, 2009

Show adminstrator account at Windows XP logon screen

When you install Windows XP on your PC, a default administrator account named ‘Administrator’ is created. This account is visible on the login screen when you boot Windows XP. But when you create any other account having administrator rights, the default ‘Administrator’ account is not shown on the login screen. If you want it to show on the login screen, follow these steps:

Open the registry editor by clicking on Start menu >Run, and typing ‘regedit’
The registry editor opens up. Go to HKEY_LOCAL_MACHINE\Microsoft\WindowsNT\CurrentVersion\Winlogon\SpecialAccounts\UserList. Double click the Administrator and change its value data to ‘1’. If Administrator is not there, right click in the right pane and select New>DWORD. Name it Administrator and put its value data as 1. That’s it. The next time you boot your PC, you will find the administrator account along with your personal account in the logon screen.

Feb 15, 2009

Enable network adaptor’s onboard processor

If you have a network card and it has got its own onboard processor, you can take off the load of network processing from your CPU. Navigate to HKEY_LOCAL_MACHINE\SYSTEM\CurrentControlSet\Services\Tcpip\Parameters and create a new DWORD by right clicking on the right hand side pane of the registry editor and selecting new>DWORD. Name it as “DisableTaskOffload”. Set its value to 0 to enable offloading network processing onto the network card. You will have to restart Windows for this to take effect.

Feb 14, 2009

Disable Shutdown in Windows XP

It’s maddening when someone is working on your PC and shuts down and shuts it down mistakenly or mischievously (whatever may be the case!) even after telling him/her a hundred times not to do so. Imagine if you can disable the shut down itself! (Off course, you can pull out the power plug though!) But if you really want to disable your shutdown in your PC, follow these steps: 

Navigate to HKEY_CURRENT_USER\Software\Microsoft\Windows\CurrentVersion\Policies\Explorer. In the right hand pane right click on a blank space and select New> DWORD Value and call it “NoClose”. Set its value to 1 to disable shutting down your PC.

Feb 13, 2009

Registry keys - a quick guide

For those who wondering about what those different HKEY commands are and what do they hold in them, here is a short guide:

HKEY_CLASSES_ROOT: All file types and their associations

HKEY_CURRENT_USER: Currently logged on User Account settings
HKEY_LOCAL_MACHINE: Computer’s configuration information – both hardware and software
HKEY_USERS: All User Account settings

Jan 20, 2009

Disable Scandisk when Windows starts

When Windows xp does not shut down correctly due to sudden power failure or forceful shutdown by the user, it performs a check to make sure your hard disk is alright. This can be a bit annoying at times. Fortunately, there is a way to disable this autocheck.

1.Go to start and click run. Type 'regedit' and hit enter.

2.Go to 'HKEY_LOCAL_MACHINE>SYSTEM>CurrentControlSet>Control>SessionManager'

3.Create a new DWORD value or modify the existing value, called 'AutoChkTimeOut' and set it according to the value data as follows:

Value Name : AutoChkTimeOut

Data Type : REG_DWORD(DWORD value)

Value Data : Time in seconds(put 0 to disable)

Jan 14, 2009

Why Doesn't Windows Remember My Folder View Settings?

Does Windows forget the view settings of certain folders specified by you? Do your folders reset to some other view setting after you close  and reopen them?  this is a very annoying problem which can eat up a lot of time. This is caused  because Windows can remember the view settings of 200 local folders and network folders by default. If you increase this value, you can get rid of the problem. To do this, you need to do some adjustments in the registry editor:

Follow these steps, and then quit Registry Editor:

1. Click Start, click Run, type regedit, and then click OK.
2. Locate and then click the following key in the registry:
HKEY_CURRENT_USER\Software\Microsoft\Windows\Shell
3. On the Edit menu, point to New, and then click DWORD Value.
4. Type BagMRU Size, and then press ENTER.
5. On the Edit menu, click Modify.
6. Type 5000, and then click OK.

and,

1. Locate and then click the following key in the registry:
HKEY_CURRENT_USER\Software\Microsoft\Windows\ShellNoRoam
2. On the Edit menu, point to New, and then click DWORD Value.
3. Type BagMRU Size, and then press ENTER.
4. On the Edit menu, click Modify.
5. Type 5000, and then click OK.

Jan 13, 2009

Unmountable Boot Volume error message

The unmountable boot error message during booting windows xp occurs when your boot.ini file gets corrupt. To fix this problem, boot your pc with the windows xp installation CD and while the pc is booting, press the R key when your see the ‘welcome to setup’ screen to repair the windows xp installation. Type “chkdsk /f” in the dos prompt that appears and press enter. Now, windows will start checking the system drive for errors and automatically remove them.
Next, type “fixboot” and hit enter. This will write a new boot sector to the system partition. Type exit and press enter to reboot into windows.

Enable Registry Editor

Open notepad and type [HKEY_CURRENT_USER\SOFTWARE\Microsoft\Windows\CurrentVersion\Policies\System]“DisableRegistryTools”=dword:00000001
Save the file and change its extension from .txt to .reg. Now double click the file and click yes to the dialog box. Restart windows, and the registry editor should be enabled.

Dec 25, 2008

Disable annoying balloon tips

Windows xp balloon tips can be very annoying at times. There is a way to turn them off. 
Go to Start > Run.
Type Regedit and hit enter.
Navigate to ‘HKEY_CURRENT_USER/Software/Microsoft/Windows/CurrrentVersion/Explorer’

In the right pane, right click and click new click DWORD. Name the new entry as ‘EnableBalloonTips’ and assign it a value of ‘0’. 

There you go, no more annoying balloon tips.

Open a small chat program in Windows xp

Windows has a small inbuilt chat program which is not accessible easily. To open it, simple go to start > run. Type winchat and hit enter.

See what is saved in clipboard

When you copy any text, image or take a screen shot of the screen this data gets automatically in a program called clipboard. You may have come across messages by some applications asking you to leave or clear the data stored in clipboard. This is where your copied date is stored temporarily. To view the saved data in clipboard, open the run dialog box by clicking start > run. Type clipbrd and hit enter. You can see the clipboard window and the copied data in it.

How to close hung programs faster

In windows xp, when an application crashes, you press Ctrl+Alt+Del to bring up the Task Manager to close the non responding program manually by pressing the end task button. But the application does not end immediately but takes some time to do so. You can actually reduce this time by making a registry tweak. 

To do this, click on start menu and click run to open the run dialog box.
In the run dialog box type regedit and hit enter.

In the resulting window, navigate yourself to HKEY_CURRENT_USER\ControlPanel\Desktop’


In the right pane, you will find a number of entries. Double click the one having the name ‘HungAppTimeout’. The edit string menu pops up. The default value in the value data field is 5000. this is the time in milliseconds after which the hung application ends. Reduce the value to about 500 or 600 and click ok.

Next time when any application hangs, you can end it quite faster

Dec 22, 2008

Change the default location for installing new applications

By default, windows xp installs all the new applications to the directory c:\Program Files.
If you want to change the location of installing new applications, 

Go to start > run
Type regedit and hit ok

Go to HKEY_LOCAL_MACHINE\SOFTWARE\Microsoft\Windows\CurrentVersion
You will find a number of values there. Double click on the ‘ProgramFilesDir.’

Type the new location where you want to install your new applications hereafter.