Dec 1, 2009

PC Case Mod Essentials Guide


Case modding is for those who are sick and tired of seeing their plain vanilla computer cases. It involves adding special components and making some arrangements inside that PC case so as to enhance is visual appearance and make it look awesome. Some guys take it as a hobby while others do it to make their cases the ultimate head turning machines. It doesn’t improve the performance of your save for better air flow, it just adds to the eye candy. Here I have tried to give a little information about some of the most commonly used yet the most effective stuff in case modding. Who knows case modding may bring out the hidden talent in you that even you might not be aware of.

• Case
All your gears of mod that jazz up the scene fit in here. This is where all the action takes place, the playground of modders to show off their skills! People have made some of the weirdest and most bizarre cases in the form of toilets to pumpkins, microwaves to nuclear bombs and what not! But we are not into making a case from scratch, we are more into buying a perfect case so that it can be modded it later on.
There are various case sizes available for different sizes of motherboards called as form factor. Your first job is to select the appropriate case for your form factor. While buying, you can choose from case made up of aluminum, steel or plexiglas. Each material has its own advantage over other. Aluminum reduces the overall weight, steel makes the internal structure strong and does not let the case vibrate, while plexiglas cases, being transparent let you flaunt the components inside. If you don’t mind spending a few extra bucks, go for plexiglas. Otherwise, aluminum and steel are always there. But as computer cases are one of those components that you don’t change too often, I would recommend you buy one with a reasonably good build quality. Before buying, make sure the case has got enough free space for circulation of air, provision for extra fans, space to fit CCFLs and other modding components. Antec, AOpen, Asus, Chieftec, Cooler Master, Foxconn, Gigabyte Technology, IXIUM, Lian Li, Lin Chi, CIRCLE, ODYSSEY, ZEBRONICS, NZXT, Shuttle Inc., SilverStone Technology, Thermaltake, Yue Lin, Zalman etc. are some of the popular computer case manufacturers.

Cathode kit:
Cathode kit or CCFL (Cold Cathode Fluorescent Lamp) is so to say the backbone of case modding. In fact, a modded case without a cathode tube is like a land without sun. A cathode kit usually consists of a cathode tube, an inverter, wires to connect with the PSU and in some cases a switch to turn the lights on and off. Cathode tubes come in a variety of colors and sizes. They are also the source so of ultraviolet radiations, which will make the UV reactant parts to glow. Installing these kits is very easy. Just mount the CCFL at the desired and most suitable position in the cabinet with the help of Velcro or double sided sticky tape provided. The cathode tube is then connected to the inverter which in turn is connected to the PSU by means of 12 volt 4 pin molex connector.
While buying, make sure that :
1. Your case has enough space to house the particular cathode tube you are buying.
2. All the components including inverter, wires, on-off switch, molex connectors are included in the kit.

Fans:
The basic function of case fans is to keep the computer case cool. But they can also make them look cool! Case fans with LED are very common. They spread the glow of LED creating the most awesome effect. Case fans come in sizes ranging from 40mm to 250mm. Fans are usually mounted at the lower front, upper back and right side panel of the case depending upon the case of course. Although their basic purpose is to improve air flow, modders see them as means to add that extra bit of style too.
Before buying,
1. Find out the size of fan required.
2. Make sure you have the necessary pins required to connect it to the power supply unit.

• Case Windows:
If you have a normal beige box case, you might want to add a transparent window on its left hand side panel to show the contents inside. What is the use of adding ccfl, led fans and other cool devices in the case if you can’t watch them? This is where case windows come into play. Window kits can be clear, colored, square, oval, circular, rectangular, side mountable, top mountable, laser cut, etched or acrylic. Some cases come with built in windows in them, so if you are buying a new case and planning to mod it, go for it. But if you want to install a case window in your boring plain vanilla case, you will have to make some extra effort, i.e. cutting a hole in the side panel or wherever you want it to put the window kit in place. This involves metal cutting skills with the help of special instruments. Just google, ‘cutting side panel in pc case’ to know more.

• Badges and Stickers
Badges and stickers are one of the coolest ways to customize and show off your case without spending too much money. Although there are loads of stickers available online, you can also come up with your own creations and get them printed as you want. There are some sites which allow you to make badges and stickers from your submitted designs.

LCD kit
LCD kits are more useful if you are overclocking your system and you need to keep an eye your PCs health. On the other hand, they are cool. So you can hook it to your baby. It usually comes preinstalled in some high end cases, but if you don’t have it, you can grab one. An LCD kit fits in the 3.5” bay or 5.25” bay and displays valuable information such as temperature of CPU, HDD temperature, CPU fan Speed, start up message etc on the front side of the case. It usually has a backlight to make the screen visible in darkness. It connects directly to the power supply of the cabinet although some can be plugged in the USB port too from inside.

• UV Reactive Paint
UV reactive paint makes the surface glow in dark when exposed to UV light. Just paint the surfaces and voila! But make sure there is a source of UV light in the cabinet. As explained above, using a cathode tube with ultraviolet radiations will solve the issue. These paints come as spray paints in different colors. They can be applied on other surface too.

There is a lot more you can do to make you case look more stunning. After all modding is an art and there are no boundaries. Keep trying until your dream machine is ready.
Good luck!

Jun 10, 2009

Embed subtitles in movies in 4 easy steps

In order to watch a movie with subtitles, you have to have a separate subtitles file for it. You can download the subtitles file easily by just googling the movie name. A subtitles file usually has a .srt extension. Now, the problem is that if you are moving the movie file to some other location say your portable media player or your cell phone, you will have to move the subtitles file too. But what if you could somehow embed the subtitles into the movie itself? that would save you from maintaining two separate files. But remember, once you embed the subtitles into the movie, you cannot remove it. So be careful while doing this. Another thing, if you want to do some editing like trimming or deleting some frames from the movie, do it after you have embedded the subtitles; otherwise you might not get the subtitles exactly in the desired frames. 

For embedding subtitles in a movie, you will need three tools

i. Divxland Media Subtitler

ii. VirtualDub

iii. VirtualDub subtitler filter

1. To start with, first keep the movie and the subtitles file ready. Open Divxland Media Subtitler, Go to File>Open Video. Browse for the movie file and click open.


2. Now go to File>Open text or subtitles. Here, browse for the subtitles file. When you have done this, you will find the subtitles text list along with its timing in the left pane and the movie in the right pane of Divxland Media Subtitles window.


3.  Now go to File>Save as and select Substation Alpha [SSA] from the dropdown list and save it.

4. The last part is to embed the subtitles. Just go to File>Embed Subtitles Click Next the OK.

VirtualDub will open up and it will start embedding the subtitles in the movie. This process will take some time depending upon the length of the movie.

You can of course leave it running in the background. When it is done, you have your movie complete with embedded subtitles.

Jun 4, 2009

Remove TV commercials or unwanted scenes from recorded videos

I was looking for a neat way of removing unwanted scenes from some of the movies in my collection. After a lot of research, I found the cure. You may want to do away with those annoying advertisements in between your favorite recorded TV shows or explicit scenes in a movie not suitable for family viewing. There is a way of getting rid of them easily without hampering the audio or video quality. Many people suggest Windows Movie Maker, but I found a little bit confusing and tedious. Moreover, it takes hours to get the final processed video.
So, all you need for this job is a free nifty tool called Virtual Dub. Here is how to get started:

1. Launch Virtual Dub, open the video file you want to edit by going to File>Open Video File.

2. Slide the Seek Bar to the beginning of the frame you want to remove.

Eg. If you want to remove the frames 1000 to 3000, place the slider at frame no. 1000

3. Click on Edit, then Click ‘Set Selection Start’


4. Move the seek bar to the final frame (frame no. 3000in this case) and Click ‘Set Selection end’ from edit menu.


5. Now, Click edit and then click delete.


6. Click on video, and the click ‘Direct Stream Copy’


7. Now you have to save the edited movie, for that, go to File>Save as AVI.


8. Saving will take some time depending on the length and size of the video you are editing.

That’s it! Check the final edited file, its size will be just a few MBs less than the original file.

Jun 1, 2009

Change the size and quality of thumbnails in Windows XP

thumbnail size increase

While navigating through different folders in Windows Explorer, sometimes it feels that the default thumbnail size of images should be a bit bigger. Or some may insist on having the thumbnail  smaller than its preset size, especially if it is taxing on their system. Here is a registry tweak you can do to change the thumbnail size as well as its image quality in Windows Explorer. Here is how to do it:

1. Click Start > Run and type regedit

2. In the registry window, go to the following location:

HKEY_CURRENT_USER\ Software\ Microsoft \ Windows\ CurrentVersion\ Explorer

Create a new DWORD value called ThumbnailSize, and set the value between 32 and 256.

And/or create another DWORD value called ThumbnailQuality, and set the value between 50 and 100.

You can do the same thing using TweakUI utility also. 

Click on Explorer and then click Thumbnials. Move the slider to change the image quality of thumbnail and put any value between 32 to 256 in the thumnail size option. Click Apply and check for changes. You may need to go back to the previous folder and then return to the folder containing thumbails to see the change. 

increase size of thumbnail, increase photo preview size

May 23, 2009

Find out how long your system has been running

Do you want to know how long has your system been running? This is a very simple method to find out the system uptime along with other important information such as product id, system model, system type, pagefile location etc.

Just follow these steps:

1.Click Start > All Programs > Accessories > Command Prompt
2.In the command prompt window, type systeminfo
3.A list of valuable information about your PC is shown

To bring the Command Prompt window, you can also follow this step:

1.Click Start > Run

2.In the Run dialog box, type cmd to open the command prompt window

system uptime

May 22, 2009

How to hide your hard disk partitions

I have always wished that I could hide my hard disk's partitions. This can be a good way of protecting your important files from the people around you who never miss any opportunity to sneak into your PC. Or it can be a really funny and maybe a cruel prank for someone who is still a novice to computers! But someone smart enough to disable this registry tweak or simply by using a little bit of common sense can have access to your drives in no time. So this is not the best way to hide your stuff from people hoping nobody will find it. I would recommend it to be played as a prank.

This trick hides all your local or networked drives. It does not deletes or disables them. So rest assured you can get them back the way they were before. This is how you hide your drives:

1.Open Start > Run and type regedit. The registry editor window opens up.

2.Find your way to HKEY_CURRENT_ USER\Software\ Microsoft\ Windows\Curre ntVersion\Policies\ Explorer.

3.In the right hand side pane, create a new DWORD value and set its value as 3FFFFFF (Hexadecimal)

hide your hard disk partitions

4.Now close window and restart your computer.

5.When the PC starts, open My Computer. All your drives would have gone. Only the Document folders will be there. But if you enter the path of any folder located in any drive such as C:/Program Files/Microsoft you can open that folder. So, anyone brainy enough to think of this can enter any drive.

6.To enable display of drives in My Computer as it was before, just delete the DWORD entry that you created in the registry editor and restart your PC.

May 21, 2009

How to end tasks automatically in Windows XP

Sometimes it happens that a certain application hangs and prevents the PC to shutdown properly and it also consumes a considerable chunk of Page file memory. As a result, your system runs at a lower speed than its original potential. To disable these applications automatically after a particular time you will have to do some registry tweaking. Just follow these steps:
But before that, do not forget to backup your registry.

1.Open Notepad and paste the following text in a new file-

Windows Registry Editor Version 5.00
[HKEY_LOCAL_MACHINE\SYSTEM\CurrentControlSet\Control\Session Manager\Memory Management]
"ClearPageFileAtShutdown"=dword:00000001
[HKEY_USERS\.DEFAULT\Control Panel\Desktop]
"AutoEndTasks"="1"

[HKEY_LOCAL_MACHINE\SYSTEM\CurrentControlSet\Control]
"WaitToKillServiceTimeout"="1000"

2.Save the file as shutdown.reg
3.Double click the file thus saved to add the information to the registry.
Thats it!

May 18, 2009

Apple Safari - Is it the fastest browser?

Apple Safari vs Opera
I don't know if its too late, but let me say this, “Apple Safari 4 is cool”. I recently downloaded it when I discovered my recent love for everything and anything from Apple. But since I am in no condition of buying any Apple product, I thought of why not to get your hands on something which is free and at the same time Apple (rare combination!)

Apple Safari has a very distinct feel compared to other browsers like Internet Explorer, Firefox or 
Opera. Apple is known for its superior design and appearance in all of their products, and this one's up the mark too. The way your web pages load and appear is quite different from other browsers and it is simply a refreshing experience. Even the thumbnail preview of history pages is neatly stacked pretty much in the iPhone style. Just like the 'Speed Dial' in Opera, Safari too has got 'Top Sites' which lets you keep a collection of your favorite pages neatly arranged with their thumbnails. As you go on using Safari, it automatically identifies the websites most frequently visited by you and puts them in the Top sites list. You can of course manually put other sites in it too.

It supports tabbed browsing, which has now become a standard feature almost all major browsers. Tabs tend to reduce a little portion of the viewable area, but still Safari manages to provide a larger viewable area thanks to the absence of those space eating menu bars, title bars and what-not-bar! I agree that Safari may seem a little weird to those who are accustomed to using Internet Explorer. But with time, they get used to it, and probably do not think of returning back to Internet Explorer.

There are however some problems which prevent me from using Safari as my default browser. Opera is still my favorite browser. The first reason is that while browsing, it takes a considerable time to return to the previously viewed page. That is, you have to wait for some time for the page to load after you hit the back button of the browser. Opera does not make you wait too long to view the previous page. In fact it shows the page instantly as you click the Back button. Maybe this is because it caches the content of the web pages in some different way, I don't know, it is an altogether different topic. I don't know if I can call this a problem but every browser that I have used other than Opera suffers from this wait-to-view-the-previous-page disease. Users with fast Internet connections do not complain about this, but for us dialup folks(Yeah, I am still on dialup!) hitting the back button in Internet Explorer, Firefox, Safari and even Chrome is a painful affair.

The other reason being the slightly longer time it takes to get started. But it does not matter much because you don't start a browser too often, you just do it once and then you browse with it. 

And yes, Apple calls it the world's fastest browser, but I found Opera faster than Safari.

May 17, 2009

How to disable programs on startup in Windows XP

A lot of programs like download managers, DVD burners, P2P clients etc associate themselves to run at startup every time Windows XP starts. Actually, this is a good feature, otherwise you would have to start the anti virus manually whenever you boot your PC which would have been a very tiring job. But this run-at-startup feature is also one of the most common reasons for a sluggish startup. When you install a program like say an on-screen image capturing utility, odds are that it will schedule itself to run at startup. Now even if you don't want to use it, the damn thing will be sitting there at the bottom right corner of your screen consuming some of the precious system memory. As the number of such programs increases more system memory gets used by them. This eventually slows down the startup process. 

You can of course search for 'do not run when Windows starts' option or something like that in the program's settings, but you will have to do that for every such program. To reduce the labor, you can do some tweaking with the registry and voila! 

Here is how to disable the programs you don't want to automatically start every time Windows boots using the registry editor.

1.Click Start > Run and type 'msconfig' without quotes. Hit enter to get the system configuration utility.

2.Click the 'Startup' tab to find the list of all the startup items that load automatically.

disable programs on startup in windows xp
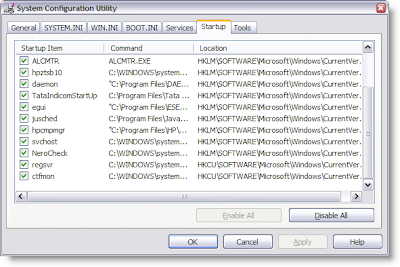
3.Uncheck the ones that you do not need. 

4.Restart the computer.

May 6, 2009

Write Protect Your Pen Drive/USB Drive

Write protection was one of the most useful feature in floppies. It allowed prevented any data to be written on the disk's surface, just by sliding a small slider. USB drives have now replaced floppies but still write protection is not a standard feature in all USB drives. Sure, some pen drives do come with this nifty feature but most of them lack it.

Write protection allows the user to read from the drive but not write on it. It is the best way to stay away from viruses. So, if you have write protection on, you dont have to worry about viruses getting into your pendrive. 

There is a little nifty utility to write protect a pen drive. Its very tiny in size and offcourse its portable. Its available in multiple languages like English, German, French, Chinese, Japanese, Spanish, etc. Its only 187 KB in size. Now even if your friends PC has a virus, then also you can insert your pen drive in it without thinking. Download it from here.

write protect your USB drive

Feb 16, 2009

Show adminstrator account at Windows XP logon screen

When you install Windows XP on your PC, a default administrator account named ‘Administrator’ is created. This account is visible on the login screen when you boot Windows XP. But when you create any other account having administrator rights, the default ‘Administrator’ account is not shown on the login screen. If you want it to show on the login screen, follow these steps:

Open the registry editor by clicking on Start menu >Run, and typing ‘regedit’
The registry editor opens up. Go to HKEY_LOCAL_MACHINE\Microsoft\WindowsNT\CurrentVersion\Winlogon\SpecialAccounts\UserList. Double click the Administrator and change its value data to ‘1’. If Administrator is not there, right click in the right pane and select New>DWORD. Name it Administrator and put its value data as 1. That’s it. The next time you boot your PC, you will find the administrator account along with your personal account in the logon screen.

Feb 15, 2009

Enable network adaptor’s onboard processor

If you have a network card and it has got its own onboard processor, you can take off the load of network processing from your CPU. Navigate to HKEY_LOCAL_MACHINE\SYSTEM\CurrentControlSet\Services\Tcpip\Parameters and create a new DWORD by right clicking on the right hand side pane of the registry editor and selecting new>DWORD. Name it as “DisableTaskOffload”. Set its value to 0 to enable offloading network processing onto the network card. You will have to restart Windows for this to take effect.

Feb 14, 2009

Disable Shutdown in Windows XP

It’s maddening when someone is working on your PC and shuts down and shuts it down mistakenly or mischievously (whatever may be the case!) even after telling him/her a hundred times not to do so. Imagine if you can disable the shut down itself! (Off course, you can pull out the power plug though!) But if you really want to disable your shutdown in your PC, follow these steps: 

Navigate to HKEY_CURRENT_USER\Software\Microsoft\Windows\CurrentVersion\Policies\Explorer. In the right hand pane right click on a blank space and select New> DWORD Value and call it “NoClose”. Set its value to 1 to disable shutting down your PC.

Feb 13, 2009

Registry keys - a quick guide

For those who wondering about what those different HKEY commands are and what do they hold in them, here is a short guide:

HKEY_CLASSES_ROOT: All file types and their associations

HKEY_CURRENT_USER: Currently logged on User Account settings
HKEY_LOCAL_MACHINE: Computer’s configuration information – both hardware and software
HKEY_USERS: All User Account settings

Feb 11, 2009

How to install Windows XP automatically

Do you hate to enter the details like serial number, user name, password, your screen resolution and other nitty gritties every time you install Windows XP on your machine? Do you wish you could stay back or may be take a small nap while your operating system installs all by itself, without any need of your intervention? That’s very much possible. All you have to do is create an answer file for the installation process which contains all the information required during the installation. When you are done with that, just zap the XP CD in the CD-ROM drive and initiate the installation. All the details will be taken automatically from the answer file. Isn’t it cool? Here is how you can do this:

1. Put the installation CD into the CD Drive and copy the entire contents of the CD to a folder on your hard disk. Browse to SUPPORT\TOOLS and extract the file Deploy.cab.

2. In the extracted folder double click the file setupmgr.exe, it will open up a wizard. Click next, choose Unattended Setup, click Next, Choose the appropriate Windows XP installation, click Next, Choose Fully Automated, click Next, Select Setup from a CD, click Next, Accept the License Agreement and click next again. A box opens up, which asks you to enter the Name and Organization. Enter the necessary information in the appropriate fields and click Next. You will be asked for all the details that are required during the installation process. Enter all the details one by one and at the end, click finish and save the file as “winnt.sif” when prompted. This is your answer file and you are supposed to save it in the i386 folder in the Windows XP installation folder you created in the beginning.

3. Now you need to burn a bootable disk. For this, you require the boot sector of Windows XP. You can obtain it from here. Extract it to a folder.

4. Launch Nero and select CD-ROM (Boot) from the new compilation dialog box. Under the boot tab, specify the boot sector file you extracted. Set the emulation as no emulation, and keep the boot message blank. Most importantly, remember to set the number of loaded sector as 4.

5. Select the disc at once method to burn the CD. Click the new button to add new files to CD. Here, you will have to drag all the contents of the Windows XP installation disc and the answer file as well. (Make sure you don’t drag the folder containing the installation files, instead drag the contents of Windows XP CD)

6. Insert a blank CD in the drive and burn it at a low speed. When it’s done, you have your own install-all-by-itself Windows XP CD!

I recommend you to keep this CD for your own personal and not to lend it to others as it contains a customized installation. 

Jan 28, 2009

Enable dropshadow behind icons

In Windows xp and its successive operating systems, the icon labels blend with the wallpaper on the desktop i.e.you don’t see any background color behind the icon text but a drop shadow behind the text. This blending effect or drop shadow effect gives a pleasant visual appearance. But sometimes, after changing the background color of desktop, your icon labels show a background color behind them as if your background is all patched up at different places. To get rid of this,

Right click on My Computer and select Properties.

Click settings under the performance tab and click on visual effects tab. Here you can play with all the available appearance effects. All you have to do is check the ‘use drop shadows for icon labels on desktop’. Click OK to finish the job.

If this does not solve the problem, you can right click on desktop select ‘arrange icons by’ option and check if ‘lock web items on desktop’ option is checked. If it is checked, uncheck it. This should solve the issue.

Jan 27, 2009

Prevent Firefox from saving url in history

Firefox places a list of your visited urls in the history menu by default. You can prevent Firefox from saving your visited websites' names in the history drop down box by following these steps:

Go to the partition where Firefox is installed (e.g. Local Disk C or Local Disk D). Browse to Document and Settings \ !user name! \ Application Data \ Mozilla \ Firefox \ Profiles \ 0e0oiola.default. There should be a file named History.dat. All you have to do is right click on it, select Properties and check the read only check box. If done flawlessly, this will enable you to surf the net without leaving behind any tracks!


Reduce size or Word Documents

Working with large files is a problem especially if you have to transfer them frequently over the internet using a slow internet connection. In MS Word XP, document files sometimes become too large in size. There is a simple and quick way to prevent this from happening. But first, let us try to understand why does this happen. Whenever you save a file in MS Word XP by pressing Ctrl+S, the program does not overwrite the entire file from scratch but incrementally saves the changes made and appends it to the original file i.e. it is simply adding more and more data to the file and making it larger and larger every time you save it. To turn off this incremental saving, follow these steps:

Click on Tools button

Select General Options

From the box that pops uncheck the ‘allow fast saves’ option

From now on, Word will rewrite the whole file from scratch each time you save it. This will take some time though to save, but file size will be reduced considerably.

Jan 25, 2009

When Windows is unable to identify your hardware

Windows xp has a very sophisticated hardware driver management system. Whenever you plug in any new hardware device, it automatically detects it and proceeds with the driver installation. But sometimes, it fails to identify some devices. In such a case, you have to manually install the drivers for that particular hardware device.

Go to Start > Control Panel > Add Hardware, to start the add hardware wizard.

Click next and wait for wizard to search for any newly connected hardware.

If it fails to detect the hardware, select the option, ‘Yes, I have already connected the hardware’ and click on next.

Select your hardware device from the list in the next screen. If you don’t find your hardware there, select, ‘Add a new hardware device’ given as the last option in the list.

In the next screen, the wizard wants to know whether you want to search for and install the hardware automatically or install the driver manually. As windows did not find any attached hardware previously, select the second option.

In the next screen, the wizard comes up with a list of various hardware categories. Select the type of hardware you are trying to install and click next.

The wizard then shows a list of different manufacturers and models whose drivers are present in Windows xp driver database.

Select the exact model and click next to install the drivers.

If the model is not present in the list then you might consider downloading the drivers from the internet by visiting the manufacturer’s website. When you are done with that select the have disk option to install the downloaded drivers.

Get rid of dialup modem noise

If you use an external dialup modem to connect to internet, you would have probably experienced a noise coming out of the modem while it tries to connect to internet. This noise can be very annoying at times. Usually, the default volume of this sound is set to maximum. If you want to disable or reduce the sound, follow these steps.

Go to ‘start’ and open ‘control panel’.

Click on ‘network and internet connections’.

Click on ‘phone and modem’ option and then on ‘modems’ tab.

Select your modem and click on properties.

Drag the speaker volume to your desired level.

Click ok and close the network and internet connections window.

Make taskbar display day and date

By default, the clock residing in the taskbar at the bottom of the screen in windows shows only time. But if you want it to show date and day as well, follow these steps:

1. Right click on the taskbar and uncheck the ‘lock the taskbar’ option. This will enable you to extend the taskbar vertically.

2. Keep the cursor at the upper edge of the taskbar and drag it vertically upwards so that it extends in the same direction.

3. You will find day and date being shown below the time.


This extended taskbar consumes a bit of screen size but it is good for those who keep asking “what day/date is it?”!

Jan 21, 2009

Use headphone jack in optical drive

Almost all of the optical drives come with a 3.5mm headphone jack. It is used to get analog audio output. What we get from the audio card is digital output. Windows xp sets digital music playback as default playback option, that is why you do not get the audio output when you insert the headphone cable in the optical drive jack as it is meant for analog output only. If you want to hear the analog audio directly from your CD-ROM drive, you will have to manually set the audio output as analog. To do this,

1. Right click on My Computer icon and click on properties.

2. Select the hardware tab and click on device manager.

3. In the device manager window, under 'DVD/CD-ROM Drives' locate your optical drive and double click it.

4. Go to properties and under the 'Digital CD Playback', deselect the 'enable digital audio from this cdrom drive' checkbox.

5. Restart your machine and you should be able to hear the audio through your headphones.

Jan 20, 2009

Extend the cable length of headphones and speakers


Headphones or Speakers usually come with a cable length of about 1m to 1.5m depending upon the brand. But for a lot of people, this length is not enough. It gets stretched whenever it is connected to pc. This ultimately leads to breaking of the cable and you have to buy a new one. You can prevent this by using a stereo audio extension cable. This cable has a 3.5mm stereo pin at one end and a 3.5mm jack at the other. All you have to do is plug your headphone to one end and the cable to your pc. These cables come in different lenghts. 

These links may help you:

worldofcables.com

amazon.com

rediff.com

Disable Scandisk when Windows starts

When Windows xp does not shut down correctly due to sudden power failure or forceful shutdown by the user, it performs a check to make sure your hard disk is alright. This can be a bit annoying at times. Fortunately, there is a way to disable this autocheck.

1.Go to start and click run. Type 'regedit' and hit enter.

2.Go to 'HKEY_LOCAL_MACHINE>SYSTEM>CurrentControlSet>Control>SessionManager'

3.Create a new DWORD value or modify the existing value, called 'AutoChkTimeOut' and set it according to the value data as follows:

Value Name : AutoChkTimeOut

Data Type : REG_DWORD(DWORD value)

Value Data : Time in seconds(put 0 to disable)

Using iPod as a hard disk

For those who were unaware of this, you can use your iPod as an external hard disk. In disk mode, you can transfer your data and use your iPod as a portable hard disk! By pressing a special combination of buttons you can activate disk mode without using iTunes. To do this,

1. First of all, reset your ipod.

2. When you see the apple logo, press back and forward(for first to third generation) until the disk mode is displayed or press select and play(for fourth generation).

3. To get out of disk mode, perform a reset

Jan 14, 2009

Why Doesn't Windows Remember My Folder View Settings?

Does Windows forget the view settings of certain folders specified by you? Do your folders reset to some other view setting after you close  and reopen them?  this is a very annoying problem which can eat up a lot of time. This is caused  because Windows can remember the view settings of 200 local folders and network folders by default. If you increase this value, you can get rid of the problem. To do this, you need to do some adjustments in the registry editor:

Follow these steps, and then quit Registry Editor:

1. Click Start, click Run, type regedit, and then click OK.
2. Locate and then click the following key in the registry:
HKEY_CURRENT_USER\Software\Microsoft\Windows\Shell
3. On the Edit menu, point to New, and then click DWORD Value.
4. Type BagMRU Size, and then press ENTER.
5. On the Edit menu, click Modify.
6. Type 5000, and then click OK.

and,

1. Locate and then click the following key in the registry:
HKEY_CURRENT_USER\Software\Microsoft\Windows\ShellNoRoam
2. On the Edit menu, point to New, and then click DWORD Value.
3. Type BagMRU Size, and then press ENTER.
4. On the Edit menu, click Modify.
5. Type 5000, and then click OK.

Jan 13, 2009

Make free calls anywhere in the world

So you thought nothing in this world is free? Wrong! You can actually make free calls or send free text anywhere in the world by registering a free account at tabrio.com. You are allowed to call for free for some initial 30 minutes (depending upon your location) until your balance runs out. After that you have to recharge your account to continue using the service. When you create an account at tabrio.com you get a balance of $0.33. You can view the calling rates for the for and from the location you are calling on the site itself. There are some other features also such as 

Tabrio Mobile which lets you start calls and send international texts to anyone at low costs without being near a computer.


Tabrio Desktop allows you to add, edit and delete contacts, add more calling locations, make calls, and send and receive text messages!

Tabrio Outlook Sync to Sync all your MS Outlook 2007 contacts to Tabrio in one easy step. Have the numbers that you need, when and where you 
need them.

Audio, Video files playing improperly

If your audio or videos files are playing as though the fast forwarding is on, causing improper audio or video output, there is a very good chance that your drivers are not properly installed. Such problems usually arise when the audio or video drivers are installed before the chipset the driver. So, to fix this problem, you need to uninstall all the drivers and reinstall them in the correct order. The correct method is to install the chipset driver first and any other driver such as audio or video later on.

When you are done with all this, reboot your system and check the audio/video files. They should play properly.

Unmountable Boot Volume error message

The unmountable boot error message during booting windows xp occurs when your boot.ini file gets corrupt. To fix this problem, boot your pc with the windows xp installation CD and while the pc is booting, press the R key when your see the ‘welcome to setup’ screen to repair the windows xp installation. Type “chkdsk /f” in the dos prompt that appears and press enter. Now, windows will start checking the system drive for errors and automatically remove them.
Next, type “fixboot” and hit enter. This will write a new boot sector to the system partition. Type exit and press enter to reboot into windows.

Enable Registry Editor

Open notepad and type [HKEY_CURRENT_USER\SOFTWARE\Microsoft\Windows\CurrentVersion\Policies\System]“DisableRegistryTools”=dword:00000001
Save the file and change its extension from .txt to .reg. Now double click the file and click yes to the dialog box. Restart windows, and the registry editor should be enabled.